If you like what you see here, you can have it delivered to your inbox by subscribing. To subscribe, simply use the box located on the left side of the blog. I hope you enjoy.
Showing posts with label decorating on a budget. Show all posts

Thursday, February 3, 2011

$3.00 Chair tansformation!!

I have to say that this has been one of my favorite projects lately. A friend gave us this chair, it was great for a boys room, but I needed it for my 6 year old daughters room.

So, I sanded and painted the chair and recovered the cushion.

(Don't you LOVE the mask, haha)
This is how it turned out, I think it is cute, and matches the colors in her room.  This transformation cost me $3.00.  I spent $0.99 on the fennel's on the top of the chair, and $2.00 on a yard of fabric, however I only used about 1/4 of the fabric.  I already has the painting supplies and sand paper.


I am linking to these great parties.


Sunday, January 30, 2011

Cheap curtains!!

I went to Walmart to look for fabric to finally make curtains for my kitchen window. I have been procrastinating on that for A LONG time. Anyway, that fabric that I liked was about $5.00 per yard, and I would have need at least two yards, I have a large window.

So, I decided to look around the store first, and guess what I found. They had sheets on sale. So, I bought one twin size flat sheet, and turned that into a Cafe curtain for my kitchen window. The sheet cost me $3.00!!

So, for a grand total of $3.00 I finally have a window treatment for my kitchen window!!
I am linking to these great parties!!

Thursday, January 27, 2011

$1.50 Decor!!

Well, you all know that i love the Good Will store and the Dollar Tree. So, this project combines those two, whoo hoo!! I found the candle stick at Good Will for $0.50, but it was pretty ugly to start with.
I gave it a coat of dark brown spray paint to cover up the ugliness.  Once that dried, I took some black paint and brushed it on, and then removed some with a rag.  I really like the effect that it gave.  Once that was dry, I brought out the trusty Gorilla Glue (love that stuff) and attached my glass container (Dollar Tree $1.00) to the candle stick.


Once it was completely dry, I added it to my bathroom.  I have a candle in the glass in the picture, but I am thinking I may fill it up with cotton ball or something else.

I am linking to these great parties.

Friday, January 21, 2011

Affordable Wall Art!!

Okay, so I know it has been a while since I posted a project, but this one was fun. I have been wanting something to go on my bedroom wall, every since we moved in, but have not had any extra money to buy a large art piece. I decided I would make something to go there, so off to Michael's I went. They have the canvases on sale this week, so I bought a 5-pack for $14.00. Then I picked up a can of spray paint, and two little bottles of acrylic paint.

I only used three of my canvases for this project. I sprayed them with my spray paint, which is a cream color. Once they dried, I let my creative side take over.


This is what I came up with. I know it is not perfect, and I do not claim to be an artist, but I have to say that it was very fun.

So, have you guys tried any fun creative projects lately? I would love to hear about them.

I am linking to these great parties.

Monday, December 6, 2010

Simple decorations with Christmas balls!!

If you are trying to decorate on a budget, have no fear, there are tons of things that you can do with regular ornaments!! Decorating for Christmas does not have to be expensive. I have already blogged about some of our decorations using natural elements, and today we will talk about ornaments, or the Christmas balls, as my children refer to them.

I wanted to add a little something to my kitchen to make it feel a little more Christmas like, so I decided to take some of the ornaments that we are not using on the tree this year and hang them in the window at the sink. I took some ribbon that I already had and tied it onto the ornaments. I hung the ribbon using thumb tacks.

I used this method in the dining room as well. I needed something else to make it look like Christmas, so I went to the Dollar Tree and picked up some large ornaments, and hung them from the light fixture using ribbon. Super simple, super frugal, and I like the way it looks!!

You could easily continue this theme throughout your home in doorways and windows!!

I am linking to these great parties!!

Tuesday, November 30, 2010

Christmas Bathroom Decor!!

Okay, to continue with the frugal Christmas decorating ideas, today I want to show you how I finished my bathroom. I placed the Christmas basket from yesterday's post on the counter, but needed something else.

So, I pulled out some of my ornaments that were not being used on the tree this year, and found a glass vase. I placed the ornaments in the vase, tied some ribbon on, and set the vase on a huge candle stick that I found a while back at a yard sale.

Tada, this is how my little bathroom counter looks this Christmas.

Stay tuned tomorrow for more frugal Christmas ideas, and the Giveaway bash starts tomorrow!!

I am linking to these great parties:
Twelve Crafts Till Chirstmas
Get Your Craft On
Take A Look Tuesday
Anti-Procrastination Tuesday

Monday, July 5, 2010

More Great Finds at GW!!

Okay, so I posted here, about the great things that I found the other day at Good Will. Well, I went back today, and they were having a sale, 50% off of everything in the store. They still had the $1.00 racks up and they were included in the sale. I found so many great things!!


I love finding little treasures that I can "re-do"!!  There are several projects coming up soon!!

So, in total I spent $10.00!!  I LOVE IT!!  Several of the clothes that I bought are going to be refashioned, and I will post them once they are finished.


Thursday, July 1, 2010

From old desk to entry way beauty!!

Okay, I wanted to share one of my latest projects with you all. When we moved into this house, I actually had an entry way area (I did not really have one of these in our other house), so I was excited but a little lost as to what I should put there. I had a small picture hanging on the wall and was thinking about adding a little table, but I did not have a table at the time.

I had this piece of furniture. As you can see it is an older desk that was originally the basic brown color. After thinking about it for a while I decided that I would try to make it work by using what I already had on hand.


The first step was to remove the knobs and sand it. This piece took a lot of sanding. I think it was because it had a shiny coat on the top. After tons of sanding I added my first coat of paint.

I went with the green paint because I had an entire gallon left over from painting my kitchen.

Once the first coat was dry, I decided to try a different technique. I brushed on a second coat, and went back with a dry brush and removed some of the paint. I am super happy with the result. You can see just a little of the brown showing through, and I have to say that I think it is fabulous.

I went shopping in my attic again, and found this big picture that I had purchased at a thrift shop a while back for $10.00. I thought I went perfectly with my newly green desk. What do you think??

(I still have to put the knobs back on!)

Now, I just have to figure out what to put on top of my desk. That will probably be my next project.

You can find more great Thrifty Thursday projects over at Tales From Bloggeritaville.

giveaways

The Shabby Chic Cottage

Life as Lori


Thursday, June 24, 2010

Magazine holder revamp!!

So on a trip to the Good Will last week, I found this magazine holder. I paid a whole $0.60 for this beauty!! I knew it was ugly, but I needed the storage, and was sure I could make it look better.

So, I decided to look through my fabric stock-pile, and found some that I thought would work well. I bought the fabric last year at a yard sale, I think I got the entire bag for $0.50.


I took out the trusty glue gun, and went to work.  I am sure you could use some sort of fabric glue, but I did not have any at the time.  So, I cut my fabric and used my hot glue gun to attach it to the magazine holder.  This is what I ended up with.
It is not perfect, but I think it is an improvement over what it looked like before, and for under a dollar I will take it!!!

To find more thrifty ideas, check out Tales from Bloggeritaville!!

Using What You Have!!

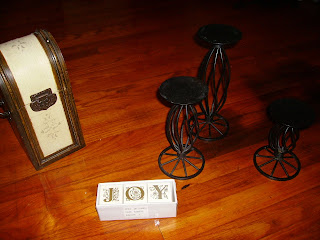
Well, since refinishing my dresser, it was a little bare on top. I decided to take a look through the attic to see what I could use to decorate it. This is what I found:
Clearance Christmas decorations, little blocks that spell JOY.
A set of yard sale candle holders.
A yard sale box.


I decided to turn the candle holders over, because I like the way they look better that way.  I placed the blocks on top of the candle holders.  For height I added a dried arrangement that I had somewhere else in the house.  This is how it turned out:


So, by shopping in the attic, I was able to decorate the top of my dresser for a whopping $0.00!!  I always knew shopping the after Christmas sale would pay off, haha!!

To find more great Thrifty Thursday ideas visit Tales From Bloggeritaville.

Thursday, June 17, 2010

Bedroom Furniture Redo for $1.00!!

Okay, so what do you do when you have a room full of furniture that does not match?? Well, if you are like me, and don't really have $1,000 extra to spend on a new bedroom set, you work with what you have. We had these three pieces.


The dresser was my husband's from before we were married; the night stand was given to us, and the little table I bought at a yard sale for $1.00.

As you can see none of them match, but I knew they had potential!!  So, what did I do??

First I removed all of the hardware, and then started sanding.  You can see my little sander on top of the night stand.  I must say that the sander has become one of my favorite tools.

After sanding, I painted.  The table and night stand only took two coats, but for some odd reason the dresser took 5 coats.  After they were all dry, I took a piece of sand paper and distressed all of the edges on the furniture.


Although it still is not a complete set, at least they are all the same color, and match the colors in our room.

The total cost for this project was $1.00.  That's right.  The furniture we already had (the $1.00 is from the yard sale table).  The paint that I used was left over from other projects, as was the sand paper. 

Here are the before and after shots of each piece!!

The $1.00 table!!

The night stand!! I need to find new knobs for the drawer.

The dresser.  I left off the half circle plates that were originally under the handles.  I have a project in mind for those.

So, what projects are you working on??

If you want to see some other really neat Thrifty projects, check out Thrifty Thursday over at Tales from Bloggerativille!!